Going digital via digital print on wood
Posted by Olivia Sum on
Creativity doesn’t have a full stop. It negates the idea of the impossible. I am sure you must have seen old photographs in museums properly framed with a “Do not touch” warning. Remember how they look like. The tint gives you the essence of the antique. Doesn’t it? After all, it is an antique piece of photograph.
How can Digital Print on wood help?

Did you ever wonder if it is possible to turn one of your digital photographs into an antique photograph? No I am not talking about adding filters on Instagram and giving it a retro look. I am talking about adding an antique essence in the total physical reality of the photo. Does it sound impossible? Unchain your creativity from the bonds of everyday and you shall find it is easily possible to have an antique piece of photo in all its true essence.
The solution is simple – we just need to print the same photo on wood. Sounds impossible again? No, it absolutely is possible if you follow the following easy to do steps:
- Arrange your supplies: A laser printed photo, wood block cut to the same size as the photograph, acrylic gel, a fine brush, butter knife, sand paper, mod podge, soft wax, brush to apply wax, pigment
- Use Lightroom to rework on the image: Since we have given ourselves a challenge of turning this into a vintage print, we would need to convert the image (if it’s a colour photograph) into grainy high contrast monochrome
- Printing: Use a laser jet ink to print it and decide the dimensions of the print. This dimension will be necessary for deciding on the wood cut.
- Arrange the wood cut: Gather the wood cut on which the digital print would happen and make sure it has the same dimension as the digital print.
- Applying Gel: Be very careful when you apply gel. It must be a single layer on the entire surface of the wood. It can neither be too think nor thin. Once this is done, place the print on the wood carefully. Make sure to smoothen it out using a roller or a butter knife.
- Wait: Let the print stay as it is overnight.
- See the result: The paper will stick to the wood. Sprinkle some water and rub it off.
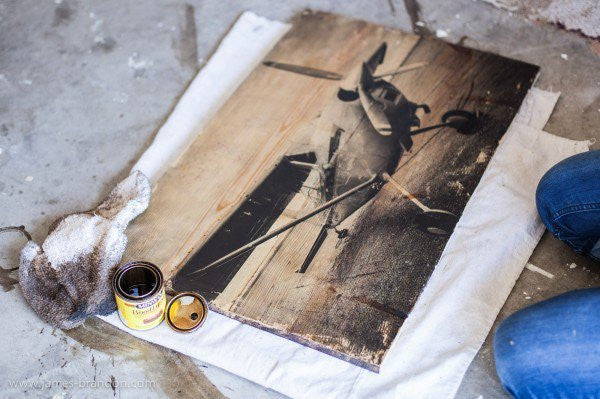
- Getting the vintage look: Use a rag to apply wood stain on the entire surface. Allow it to set for some time (few seconds) and remove it immediately using the rag.
- Finish: Add a little bit of Pigment if you want to. It can be used to weather the print to add another layer of vintage to the same. Or else just use sandpaper and distress the wood. Make sure to seal the print for a long lasting use. Use soft wax for the same.
There, you have your first digital print on wood.
Finding the right digital print on wood for your furnishing needs

A lot of digital print on wood is available online. For choosing the right digital print on wood, identify what suits the following in the best way possible:
- Colour scheme of your furniture
- Lighting scheme of your residence
- Type of furniture – wooden, distressed wood, cane, bamboo, and metallic
- Space – is it for your bedroom or the living room?
- Content – Is it a portrait photograph? Or is it your favourite quote? Or is it your marriage certificate? Is it a snapshot from one of your favourite westerns?
Digital print on wood is the answer to time
Every day new history is made. Stick to your memories and give them an antique feel, a vintage essence by digital printing on wood. In the contemporary times when everything has gone digital, let's rewind a little and give digital an outdated look that looks chic and trendy today.
You can find digital print on wood paper at the digitalpaper.shop website.
Share this post
- Tags: crafting, creative, ideas, patterns, scrapbook-ideas, shapes, wood-digital-paper